
I thought probably this way would be easier to read and search the ATEM Streaming Bridge setup instructions, so here is the part from the September 2020’s manual:
The ATEM Streaming Bridge allows you to decode the streaming video from any ATEM Mini Pro and convert it back to SDI or HDMI video. It allows you to send video over your local network, or to anywhere in the world via the internet.
You can connect ATEM Streaming Bridge in 3 different ways. One is to connect it direct to your ATEM Mini Pro using a simple Ethernet cable, or you can connect it via your local network, or you can use it anywhere in the world using the Internet.
ATEM Streaming Bridge could be used by broadcasters to allow remote ATEM Mini Pro studios to connect into broadcast infrastructure. Or it can be used to connect to large projectors or digital signage in large public venues.
Getting Started To get started with ATEM Streaming Bridge, then you only need to connect the Ethernet and plug in a monitor. Simply connect the Ethernet cable to the ATEM Mini Pro and the other end of the same cable to the ATEM Streaming Bridge. Next, connect a video monitor to the SDI or HDMI video output of the ATEM Streaming Bridge. Now press the on air button and you should see video appear on the monitor.
This “direct connection” way is the simplest way to use the ATEM Streaming Bridge. You can also connect it via your local network, however you will then need to select the ATEM Streaming Bridge in the streaming palette in the ATEM Software Control. A list of all streaming bridges on your network will appear in the platform menu.
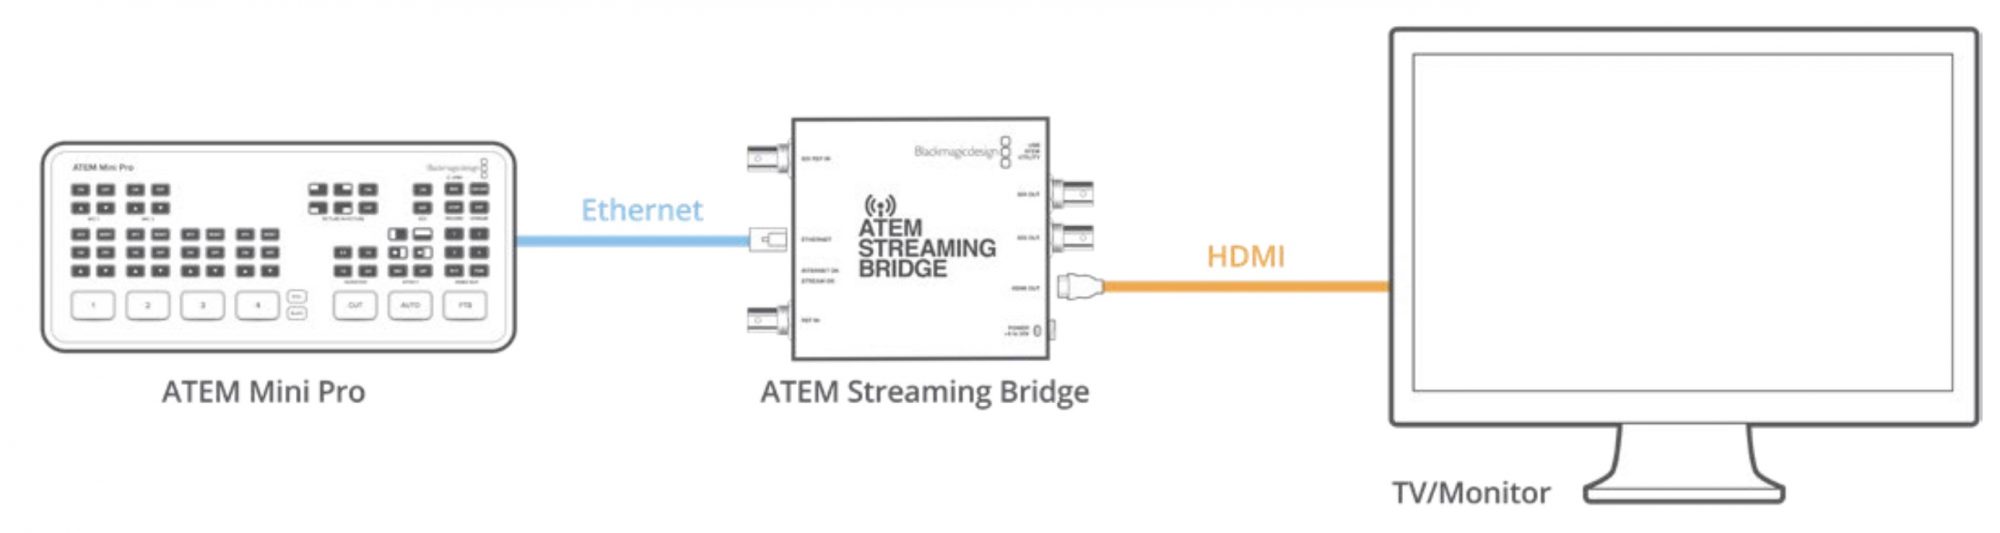
Direct Connection The simplest way to get ATEM Streaming Bridge operating is to plug it into an ATEM Mini Pro with a simple Ethernet cable. The ATEM Mini Pro will see it and automatically send video to it when you press the on air button.
Setting up a direct connection
-
Plug power into ATEM Streaming Bridge
-
Connect an Ethernet cable to the ATEM Streaming Bridge
-
Connect a television to the HDMI on ATEM Streaming Bridge.
-
Connect the other end of the Ethernet cable to ATEM Mini Pro
-
Press the On Air button on the ATEM Mini Pro.
Now you should see video appear on the HDMI television connected to ATEM Streaming Bridge.
Network Connection You can also connect ATEM Streaming Bridge to your network and place it anywhere in your building. This can be useful when you want to live stream to a conference room, or a video projector. As there might be more than one ATEM Streaming Bridge on your network, the main difference is you will need to select the ATEM Streaming Bridge in your ATEM Mini Pro network settings. This will ensure your ATEM Mini Pro knows what streaming bridge it needs to send its video data to.
Setting up a network connection
-
Plug power into ATEM Streaming Bridge
-
Connect the ATEM Streaming Bridge Ethernet to your network.
-
Connect a television to the HDMI on ATEM Streaming Bridge.
-
Ensure your ATEM Mini Pro is connected to the same Ethernet network.
-
Connect ATEM Software Control to control your ATEM Mini Pro.
-
Open the streaming palette and click the platform menu.
-
Confirm the ATEM Streaming Bridge is listed in the menu.
8. Select the ATEM Streaming Bridge in the platform menu.
9. Press On Air button on the ATEM Mini Pro.
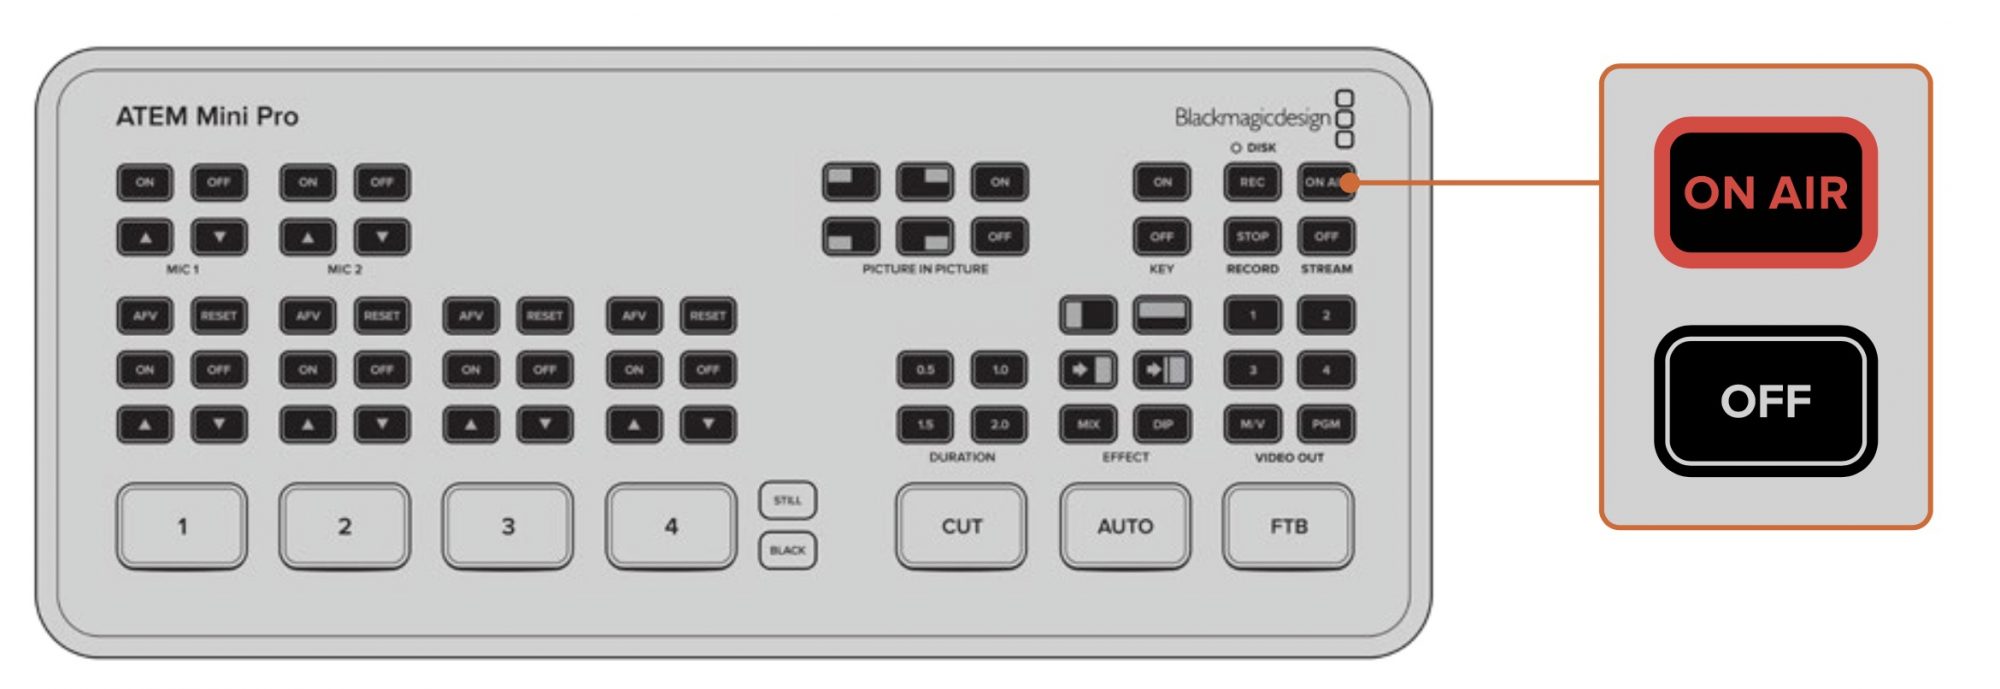
Now you should see video appearing on the HDMI Television.
Network Status Indicators There are 4 lights on the ATEM Streaming Bridge that provide information on the state of the network connection. The 2 LEDs on the Ethernet connector will show the state of the connection itself. The right orange LED indicates the network is up and connected ok.
The left green LED will show network activity.
The INTERNET OK indicator will illuminate when the ATEM Streaming Bridge can see the Internet. It indicates your Internet connection is ok and the port forwarding has been setup correctly.
The STREAM OK indicator shows the ATEM Streaming Bridge is receiving streaming data from an ATEM Mini Pro. If you don’t see images out of the video connections but this LED is illuminated then you might have a problem with your video connections. Try connecting a monitor direct to the SDI or HDMI outputs of your ATEM Streaming Bridge.
ATEM Streaming Bridge does not appear If the ATEM Streaming Bridge does not appear in the list, then it’s important to confirm both the ATEM Streaming Bridge and the ATEM Mini Pro are on the same Ethernet network.
If the ATEM Streaming Bridge still does not appear, then it could be an issue with the network settings in the ATEM Streaming Bridge itself. This can happen if the ATEM Streaming Bridge has been used by someone before you and they could have changed its network settings.
As new from the factory, the ATEM Streaming Bridge is set to DHCP so it should connect to your network without any settings changes required, but if it’s been changed, then you will need to check its network settings. You can change the ATEM Streaming Bridge settings using the ATEM Setup software.
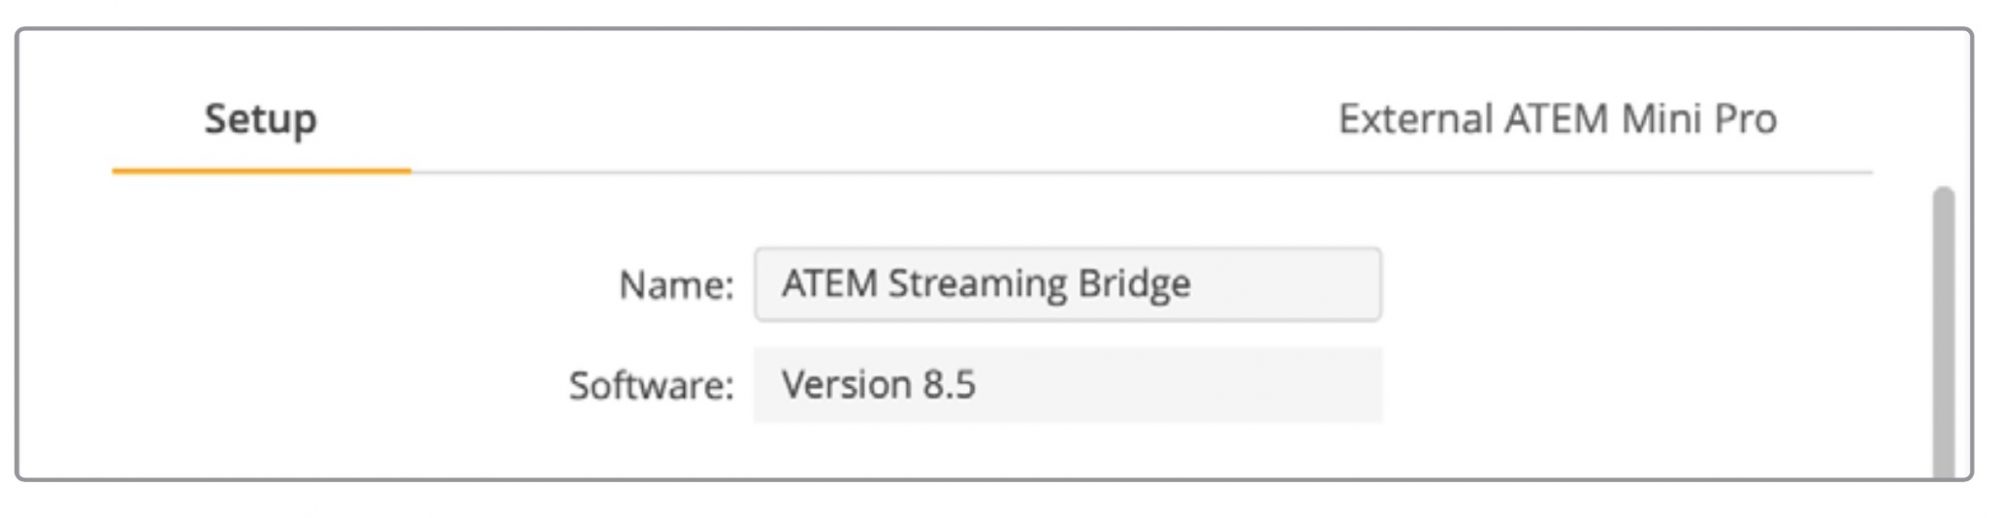
Connecting ATEM Setup software The ATEM Setup software is found in the Blackmagic ATEM Switchers folder. It’s the same software you can use to set up your ATEM switchers and it also handles updating software in your ATEM switchers as well as the ATEM Streaming Bridge. Simply plug your ATEM Streaming Bridge USB-C connection to your computer and then run the ATEM Setup software. You should see the ATEM Streaming Bridge as one of the devices you can connect to in the ATEM Setup. Click the ATEM Streaming Bridge icon to open the settings.
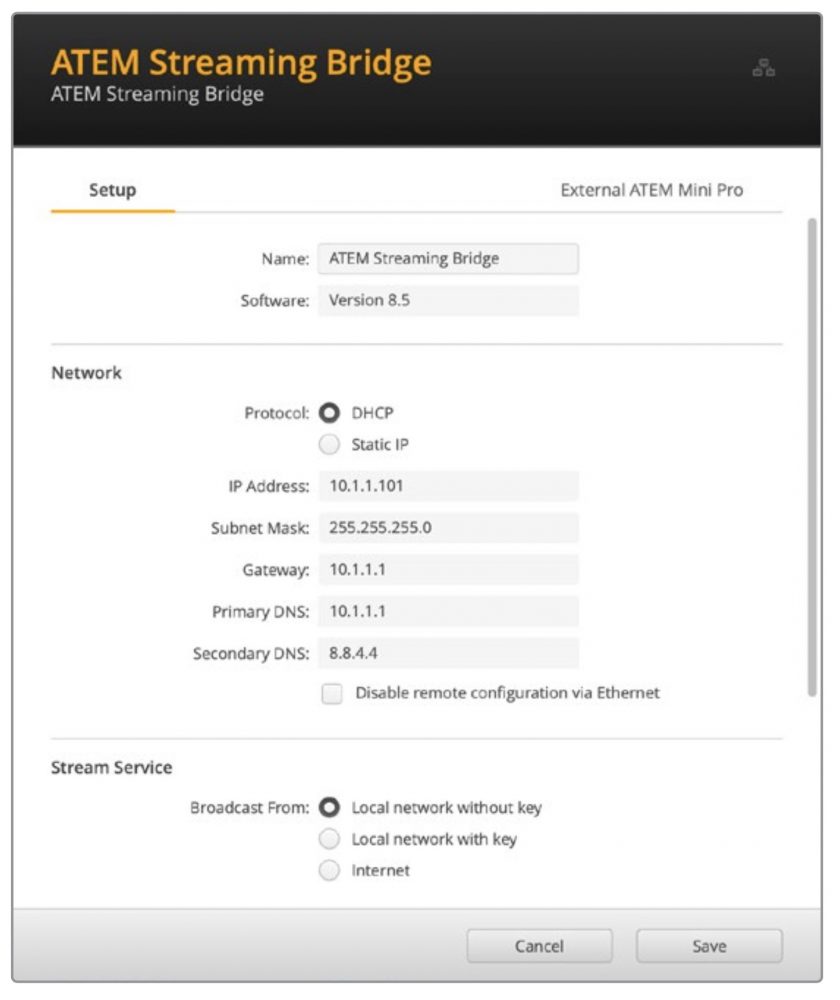
Click the ATEM Streaming Bridge icon in ATEM Setup to open the settings
Now you can see information such as the ATEM Streaming Bridge name and the network settings. If you are connecting via the local network, then most of the time you can select DHCP. This will let your ATEM Streaming Bridge find its network address on the network automatically and this is how most people connect their computers to a local network. With DHCP the network itself will take care of the correct network settings for anything connected to it. It’s the easiest way to connect.
However if you have a network administrator, it’s possible your network might have custom IP addresses for all the equipment connected to it. It’s best to check with your network administrator if they are managing your computers and network in your company. Now you have the ATEM Streaming Bridge set to DHCP, try looking at the platform menu on the ATEM Mini Pro again to see if the ATEM Streaming Bridge has appeared in the list. The ATEM Mini Pro should automatically see the ATEM Streaming Bridge on your network.
Changing the ATEM Streaming Bridge name While you are using the ATEM Setup, it’s a good idea to give your ATEM Streaming Bridge a custom name. If you are using it on a projector in a public space in your building, perhaps call it “Main Projector” or if you are using it for a large television in a conference room, perhaps call it “Conference Room 3” or similar. This means when you have more than one ATEM Streaming Bridge, you can tell which one is which.
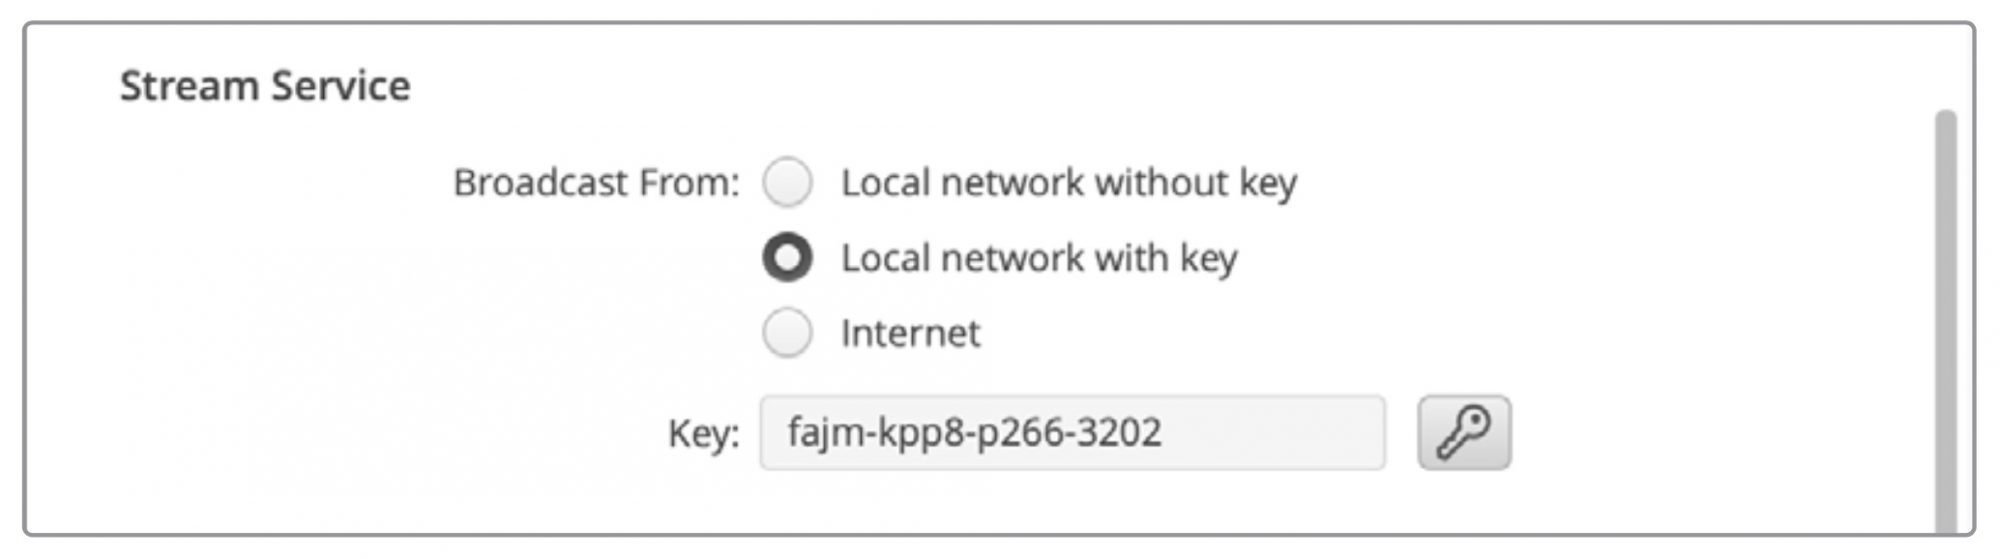
Setting a streaming key Because anyone can stream to any ATEM Streaming Bridge in the menu, it might be a good idea to set a streaming key to stop anyone crashing into your video link! It’s so easy to select any ATEM Streaming Bridge on your network, that it could become chaos of everyone streaming over the top of everyone else.
This is not an issue as you can set a streaming key. This is a password that stops anyone from accessing your ATEM Streaming Bridge. While running the ATEM Setup, you can see the streaming key text entry field. Simply type in a password here, and then only ATEM Mini Pros that have the same streaming key in their streaming settings will be allowed to connect to this ATEM Streaming Bridge.
You can set a password of your choice, but there is also a password generator button in the ATEM Setup so you can ask the computer to generate a good secure password. You can just copy and paste this password to who you want to connect to you. Once they enter it into their ATEM Mini Pro, only they will have permission to connect to this ATEM Streaming Bridge.
Clicking the generate key button will automatically generate a password for your stream
Remote Administration While we are suggesting you connect via USB to update settings in the ATEM Streaming Bridge, you can also connect via Ethernet over your local network. However this can create a security issue where someone could run the ATEM Setup and change the ATEM Streaming Bridge settings. To increase security, there is a setting to disable remote administration via Ethernet so you can only change the ATEM Streaming Bridge via a direct USB connection.

Disable remote configuration via Ethernet if you want to change settings via USB only
Internet Connection The most exciting way to connect ATEM Streaming Bridge is via the Internet. This is a little more tricky, because you have to make sure an ATEM Mini Pro can find the ATEM Streaming Bridge, from anywhere in the world. It’s a big world, so there is a few more settings you will need to update to make this work. However because ATEM Mini Pro has a broadcast quality hardware streaming engine built in, we can take advantage of this and get very good quality video links worldwide. This allows you to set up a network of studios who can stream to each other.
What you need To connect to the Internet, you will need a connection to the Internet from both your ATEM Streaming Bridge and the ATEM Mini Pro that will stream to it. You will also need to have a public IP address for your ATEM Streaming Bridge as your ATEM Mini Pro needs to connect to it, and you need a fixed address that won’t change over time.
The problem is your ATEM Streaming Bridge is on your local Ethernet network, however you need it to be visible on the internet. ATEM Streaming Bridge uses port forwarding in your internet firewall to allow the ATEM Mini Pro on the internet to connect via your internet connection to the ATEM Streaming Bridge. If this is not set up, then the ATEM Mini Pro won’t be able to find the ATEM Streaming Bridge.
What this means is you need to ask an internet provider, or your network administrator to set up port forwarding on your internet connection to “TCP port 1935”. They will know what that means!
The good news is the ATEM Streaming Bridge will also attempt to set up this port forwarding feature for you, as most internet connections and firewalls have a protocol for setting up the port forwarding automatically. This means it’s possible the ATEM Streaming Bridge will communicate with your network gear and try and set this up for you as you set up using the ATEM Setup utility.
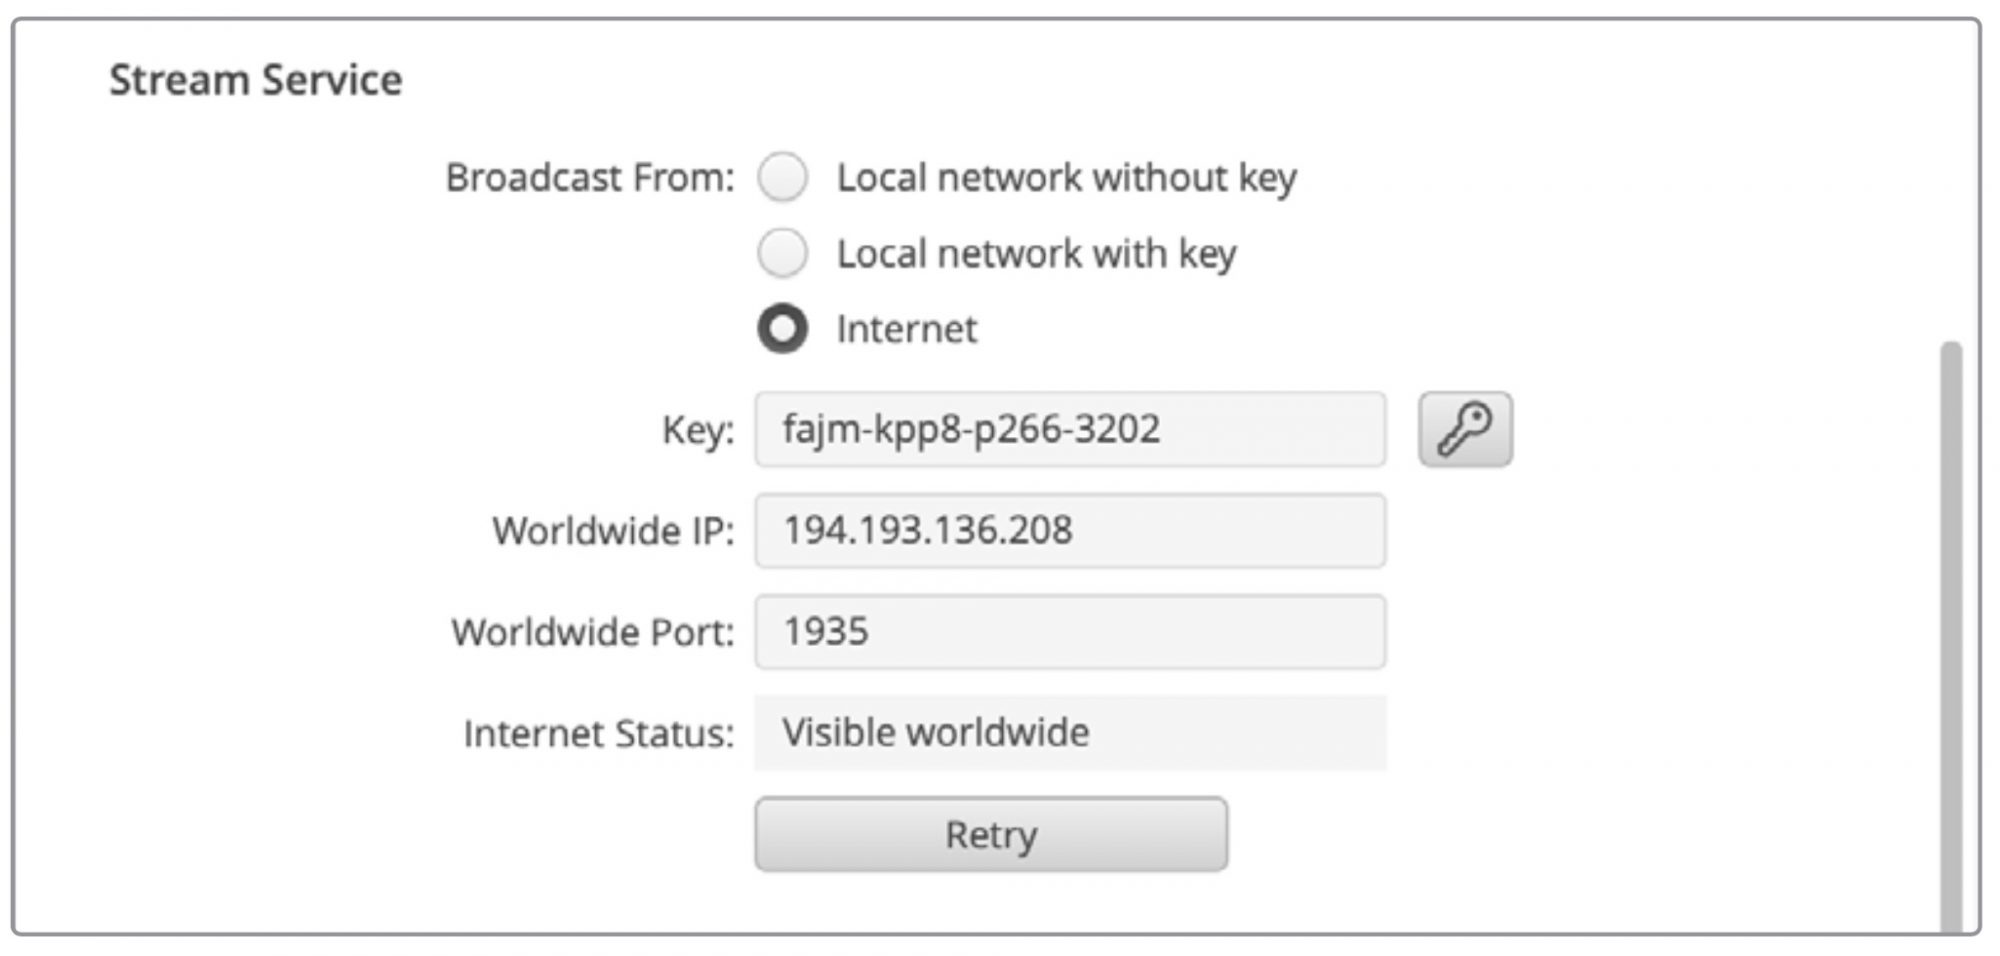
Confirming access to the internet You will notice lower down there is a connection status field. The ATEM Streaming Bridge will attempt to connect to the internet and let you know if everything looks like it’s functioning correctly. If it changes to connected, then this is a good sign, as it means the ATEM Streaming Bridge has been able to set up your network equipment with the port forwarding settings and connect to the internet ok.
NOTE: Opening up ports in your network for outside traffic could reduce your network security so it is best to check with your internet provider or network administrator if you have any security concerns.
If the connection status does not say visible worldwide you might need to configure the port forwarding on your internet firewall manually. Not all firewalls support the protocol for automatically setting up this kind of information, but they do all support setting it up manually.
You may need to contact your internet service provider if you cannot access the router controls or do not know how to configure port forwarding. On larger networks it is best to speak to your network administrator for setting up port forwarding as this will make sure there are no conflicts on your network.
Connection Status While setting up the network connection, the connection status feature can help you sort out any problems. Some of the information it can show and the cause of the problem are listed below.
Visible Worldwide:
This is a good sign, and it means everything looks to be working correctly. It means port forwarding is set up and working and ATEM Streaming Bridge is ready to receive a video stream from the Internet.
No Internet Access:
This indicates the ATEM Streaming Bridge cannot connect to the internet. You will need to check your network settings and internet connection.
Port Forwarding Error:
This indicates that you could be connected to the internet, but the port forwarding in your internet firewall was not able to be set up via the ATEM Streaming Bridge, so it’s not reachable from the internet. You will need to ask your network administrator to set this up for you.
UPnP error:
This weird error message also means ATEM Streaming Bridge is unable to set up port forwarding on the internet router. You will need to ask your network administrator to set this up for you or you will need to consult the router’s documentation to set up port forwarding.
Connecting to ATEM Mini Pro The best way to think about the internet connection is to understand that out in the world somewhere, an ATEM Mini Pro wants to connect to the ATEM Streaming Bridge you are currently setting up. It could be anywhere in the world and so how do you make sure that remote ATEM Mini Pro can connect to this ATEM Streaming Bridge?
It can be complex to try and explain network settings to a remote studio over the phone, or in a message, so we have made this process very easy.
In the ATEM Setup, there is an ATEM Mini Pro tab that allows you to see the settings required in the remote studio and you can set up the remote ATEM Mini Pro right here. Once you have the settings confirmed, you can export and email them to the remote ATEM Mini Pro.
There is not really many settings to do, because most of them are copied across from the main ATEM Streaming Bridge settings. This assumes you have the ATEM Streaming Bridge connected to the internet and everything is working ok with the port forwarding feature of your firewall, as described above.
Creating remote ATEM Mini Pro settings
1. In the ATEM Setup ensure the network settings are correct.
2. Select the ATEM Mini Pro tab in the top right of the window.
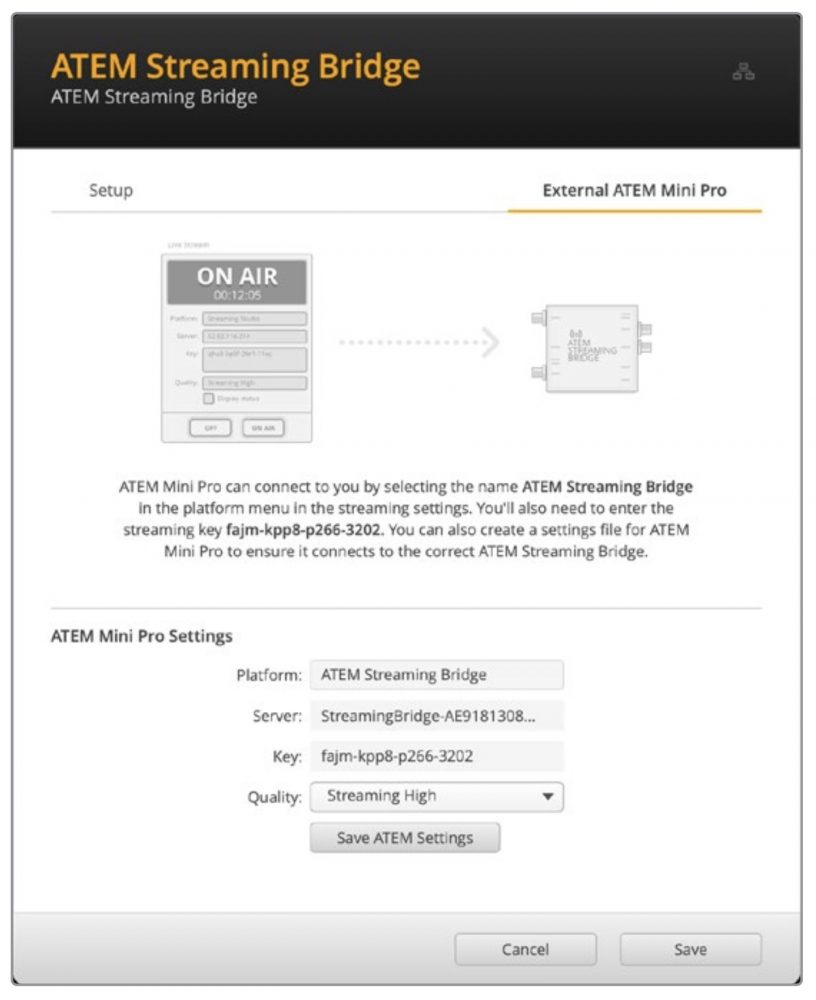
3. Select a custom name for the service.
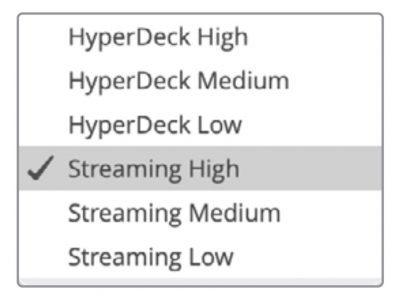
4. Select the quality you want to stream.
5. Select the export settings button to create a settings file.
6. Email this settings file to the person using the remote ATEM Mini Pro.
This settings file is what you will send to the remote ATEM Mini Pro and it has all the settings contained in it so the remote ATEM Mini Pro knows where to find this ATEM Streaming Bridge.
It’s worth noting that this file is a very similar kind of XML file used on ATEM Mini Pro for its streaming services. More technically qualified people can even open and make changes to this file if you have a unique or custom setup.
The name you give the service will be the name listed in the platform menu in the remote ATEM Mini Pro streaming settings. The quality setting will set the remote quality setting in the ATEM Mini Pro.
Remote ATEM Mini Pro Now you have this settings file and have emailed it to the person using the remote ATEM Mini Pro, there is a few things they need to do. These steps are quite simple, so it should be very easy for the remote ATEM Mini Pro studio to get these settings loaded.
All the remote studio needs to do is go to the ATEM Software Control and select load streaming settings in the stream menu at the top of their screen.

Once loaded, a new service will be added to the platform menu in the streaming settings. They just need to select this menu and press on air to start streaming.
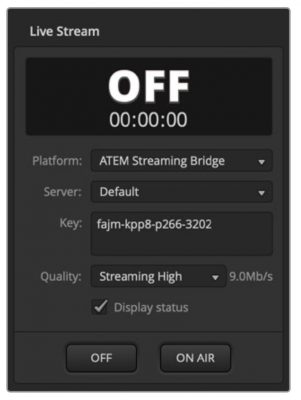
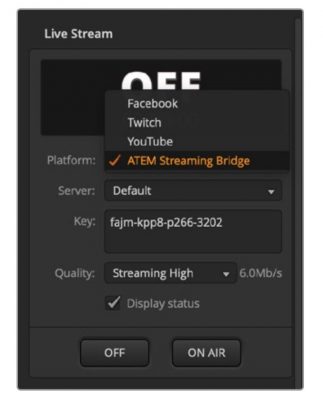
Select the ATEM Streaming Bridge from the platform menu in ATEM Software Control’s live stream palette
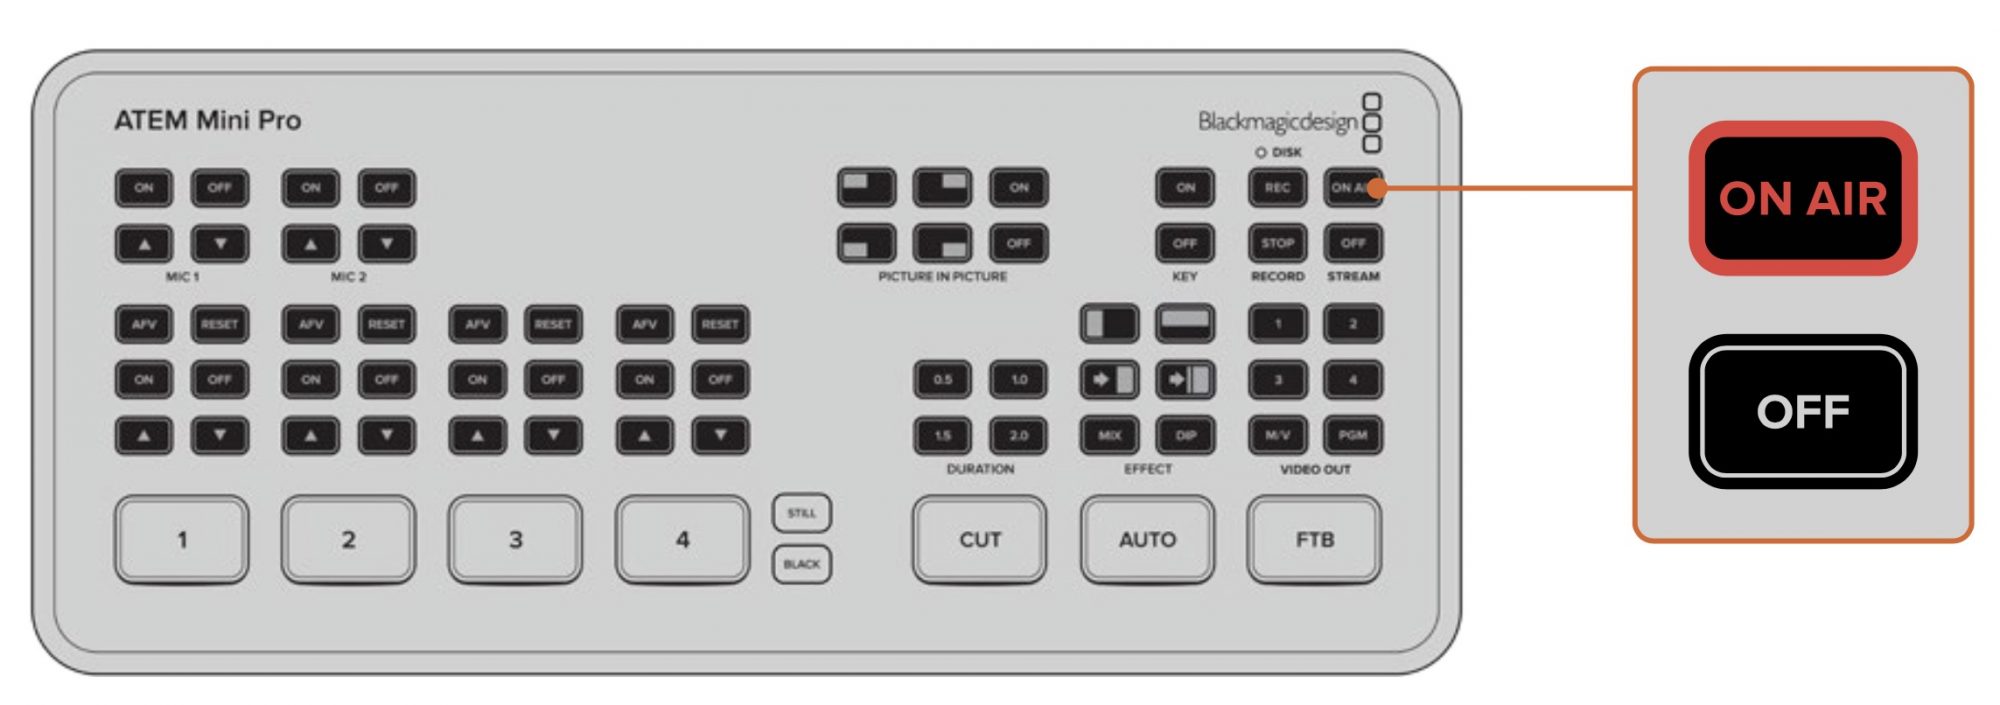
When the ATEM Streaming Bridge has been selected in ATEM Software Control’s live stream palette, press the On Air button on the remote ATEM Mini Pro
The on air button should illuminate solid and the remote ATEM Mini Pro should start sending its streaming video data to your ATEM Streaming Bridge. If the on air button is flashing, then it indicates it has not found your ATEM Streaming Bridge or there is a network problem with either the ATEM Mini Pro or ATEM Streaming Bridge end of the link.
Even though a lot of the ATEM Streaming Bridge setup has been designed to be easy and the setups as automatically as possible, such as the port forwarding settings on your internet firewall, the Internet equipment can be horribly complex and it’s often so complex it’s possible the equipment used on your Internet connection might not have been designed by humans. So don’t feel too bad if you cannot make this work! You might need a network administrator or IT person to help if you cannot make it work by yourself.
Broadcast Video Reference The ATEM Streaming Bridge has both an analog tri-sync and black burst video reference input as well as an SDI input that can be used for reference. Reference is used by large broadcasters who need all the video connections in their facility to be aligned so they can be switched around a large system. There is referencing timing settings in the ATEM Setup.
Factory Reset If you have become a little lost and you want to reset the ATEM Streaming Bridge back to its default factory settings, then you can select the ‘factory reset’ button in the ATEM Setup software. This can be useful if you have been using ATEM Streaming Bridge for an internet link and you now want to move it to a new setup using your local network. Just factory reset it and it will be set back to DHCP and you can just connect and find it on your local network.
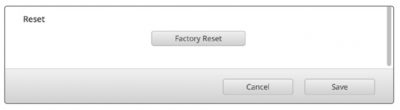
Click the reset button to restore ATEM Streaming Bridge to DHCP so it can be found on your network automatically